| Home | Housing | Feeding | Requirements | Breeding | Biology | Books & Links |
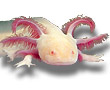
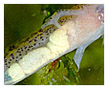
Rearing AxolotlsIntroduction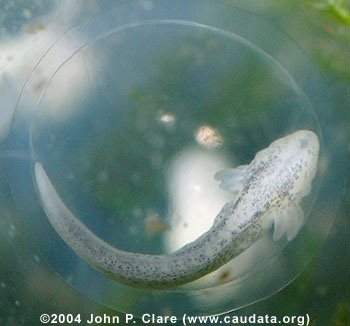 I first bred axolotls successfully in the late 1990s. Thankfully I was very successful. By following the advice and directions on this page, you should be too. Axolotl larvae are surprisingly tough, as far as newt and salamander larvae go. By the way, "larvae" is the plural of larva, the term used to describe axolotls (and other newts and salamanders) that have yet to develop all four legs. Due to their toughness, if we follow the guidelines on this page we shouldn't have any major problems rearing the larvae. We should bear in mind that there will always be a few casualities when rearing large numbers of larvae. Some larvae will have "unseen" genetic problems, some will succumb to stress that others will survive, and some will just be plain unlucky. For the beginner, it is most advisable to attempt to rear only a few larvae at a time. It's better to give away or, though it may seem unpleasant, cull most of the eggs, giving the remainder all of your attention and resources, than to try to rear many hundreds of larvae for the first time and see them all die due to stretched resources, bad water conditions, or other problems frequently encountered by beginners. If you have too many eggs, you will find plenty of people willing to accept them from you on the Caudata.org Forum. Likewise, if you are looking for axolotl eggs or young axolotls, you will find them there too. Unusual colours, like the melanoid axolotl larva we can see at the top of this page developing in its egg, are often available through the Forum. Initial care of eggs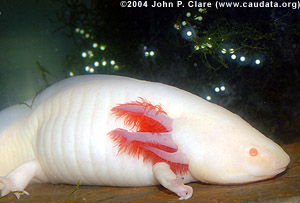
Finding axolotl eggs, or seeing a female spawning, often occurs when we least expect it, or at least not quite on the day we expect. It's always a good idea to keep an eye out for old spermatophores in the parents' tank so that we have some warning that there may soon be many new mouths to feed. On finding eggs, we must decide if they are to be removed, or the parents are to be removed and the eggs left behind. Many first time breeders opt for the latter choice, but axolotl eggs are quite tough, so the eggs can usually be removed from a tank and moved to another without issue. They can even be removed from rocks if you're careful: there is generally a point of attachment to the egg's outermost jelly layer, which can be sliced with a finger nail, thus freeing the egg. Each egg is surrounded by several layers of jelly, so don't be too afraid. Eggs attached to plants are great, because they will stick to the plants. The plants can be moved carefully to the new tank, thus avoiding all hand contact with the eggs themselves. 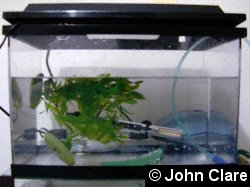
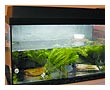
Once you have made your choice (to move or not to move the eggs), it's time to make sure we have correct conditions for the eggs to hatch. Pictured to the left is a small aquarium (45x20x25 cm, 18x8x10 inch) solely for hatching eggs (I opted to hatch just 100 in this case). Remember to use dechlorinated water. Water shouldn't be soft: do you get limescale in your water pipes or kettle? If you get limescale, your water isn't soft. If you're not sure, you should read the Requirements Page for more information about dissolved salts and their importance. Our next concern is water temperature. Keeping the eggs at a warm temperature (to an absolute maximum of 25 °C /77 °F) will cause the eggs to hatch sooner (generally in less than 14 days), whilst a lower temperature (such as 18 °C / 64 °F) will result in them taking perhaps more than 20 days. Being able to manipulate the time taken to hatch can be very useful if you need a while to secure a food source for the newly hatched axolotls. By lowering the temperature you can give yourself an extra week or two in order to acquire some brineshrimp eggs, culture your Daphnia, or order some microworms from a dealer. Food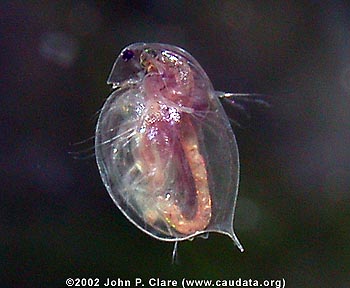 Speaking of food for little mouths, it's time we considered our options. If you bred your axolotls deliberately, the chances are you are already setup as far as providing tiny live food items is concerned. More often than not though, we need to acquire these food items in a hurry. Newly hatched axolotl larvae can vary in size from 10-13 mm (roughly 0.5 inch). On hatching, they will still possess some egg yolk in their stomachs (the white substance that should be quite visible to the naked eye). Until this is used up they will be motionless and won't require food. Within 24-72 hours after hatching, they will require food. From this point until they reach approximately 20 mm in length (a little under an inch), their diet must consist solely of live food items of a very small size. They will ignore dead food until they have grown significantly. This is because, instinctively, young larvae respond to prey movement alone. It is not until later that smell will play an important role in feeding. If you cannot meet this demand for tiny live food, your larvae will starve to death, unless they eat each other (very hard to do for newly hatched larvae). For newly hatched larvae, the live food choices are: newly hatched brineshrimp (Artemia), small Daphnia (see the photo on the right) or Moina, and microworms (microworms are not ideal and won't be well received until the axolotl larvae develop their front legs). There is an excellent article about tiny live foods at the Caudata Culture web site, and I recommend you read that before proceeding. There is a good article about foods for newly hatched salamanders over at Caudata Culture. Here's a link to that article. My preference is to feed young Daphnia, with some microworms as back up. I culture both, myself. I wouldn't recommend feeding wild-caught Daphnia or Daphnia obtained from an unknown source when feeding axolotls, or even fish. They have been known to carry diseases if taken from nature or sources containing other animals. Culturing your own, however, removes most of this danger, and although not as small or quite as nutritious as newly-hatched brineshrimp (young Daphnia are approximately two and a half times the size of newly hatched brineshrimp), young Daphnia are a good first food for axolotl larvae, and they can be free! I feed mine on crushed trout pellets (the same ones I feed the axolotls). The Daphnia don't actually eat the pellets but rather the bacteria that grow as a result of the leeching of nutrients from the pellets into the water. Microworms aren't the most nutritious food - axolotls fed solely on these will grow very slowly, and won't be received well by larvae that have yet to develop their front legs. They are a good food when you are in need though. After HatchingIf you'd like to see a photographic diary of my first albino embryos as they developed before hatching, then look at the Embryo Photo Series Page. On hatching, most axolotl larvae are about 11 mm (less than half an inch) in length. Just before hatching I normally lower the water level to about three or four centimetres (an inch and a half) so that any daphnia in the tank are concentrated near the larvae for easy access. Once most of the larvae have hatched, it is a good idea to tear the jelly coat of those eggs that haven't hatched yet in order to free the larva inside. This can be done with a sharp forceps or narrow scissors that is inserted into the egg and then the prongs/blades are pushed apart. As explained earlier, at this stage the larvae usually won't eat because they're still absorbing the yolk from their eggs. You should be ready with your chosen first food. I normally have some Daphnia in the tank a few days before hatching in order to have lots of little tiny young Daphnia present when needed. The larvae can get air bubbles in their stomachs if not fed early enough, but these will be expelled once they start to feed.  Very young larvae can be kept together without much risk of cannibalism since this really only begins once the front legs develop. When very young they should be fed frequently (once or twice daily). If kept at about 20 °C (68 °F) they should reach about 1.5 cm in length within a week. The larva pictured on the right is four days old and 14 mm in length. It is D/D M/m a/a (see the Genetics Page for more information about colour). If feeding brineshrimp, at least some of the water should be replaced each day because newly hatched brineshrimp die quickly in fresh water and can foul the water in a matter of hours. As mentioned above, Daphnia will live in the tank with the larvae until eaten, so occasional water changes are fine (partial water changes a few times a week). Larvae never grow at the same rate, so it is advisable to divide them up according to size once they begin to reach about 2 cm in length. At this size the larvae become more cannibalistic, since they snap at anything that moves and at that size can damage their siblings (missing limbs and gills are an obvious sign). The larva below-left is a D/D m/m a/a sibling of the larva above-right but at 7 days old. It is 19 mm in length. 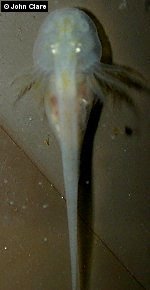
Cannibalism is a natural tendency, and studies have been carried out on the cannibalistic variants of salamander larvae. If left to cannibalise their siblings, they actually develop different morphology (shape and appearance). This is most noticeable in the shape of the head and the teeth. James Petranka's Book, "Salamanders of the United States and Canada" discusses cannibalism in detail, especially in the case of the Tiger Salamander, with some excellent photography, and William Duellman and Linda Trueb's book, "Biology of Amphibians", contains some excellent diagrams of the head morphology of the different morphs of the tiger salamander, a close relative of the Axolotl (see the Books and Links Page). In young larvae, particularly melanoid albino larvae like that on the left, you can actually see the liver, heart, stomach and intestines right through the skin. To minimise cannibalism, Peter Scott recommends that the tank is heavily planted and that light levels are lowered. A more reliable method is to reduce the numbers as much as possible in each container, but appetite does seem to decrease in low light. It's been my experience that front legs begin to develop once the larvae reach 20 mm (within about 9 days of hatching at about 22 °C) and the hind legs begin to develop at the end of the third week. This all depends on temperature and feeding. The lungs first develop around the time that the rear-legs develop (yes, axolotls do possess lungs as well as gills). As the larvae grow they need to be thinned out, and any deformed or markedly inferior larvae (such as those that don't re-grow limbs and gills easily) should be euthanised/culled. There has been a lot of inbreeding in axolotls over the many years they have been kept in captivity, and this means that the likelihood of defects and oddities developing is greatly increased in this species. 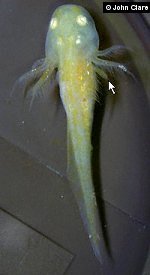
Using the conditions just described, at 7 days, I still feed young Daphnia to the larvae, and most of the larvae are about 18 mm in length. At 9 days, most larvae have very noticeable front limb buds and most are about 20 mm in length. This is a high growth rate and I attribute it to the daily feeding of young Daphnia and the temperature at which they are kept (22 °C). The golden albino larva on the right is 10 days old and is 22 mm in length. The arrow is pointing at a limb bud. At this size they eat adult Daphnia (which are 2.5-3 mm in length). At 25 mm (1 inch) I try to maintain a maximum of 25 larvae per 45x20x25 cm aquarium. Remember, if you have too many larvae, either find new homes for them or cull them to prevent disasters. At 25 mm, hind leg buds should be quite apparent on most larvae and some should have well-developed front legs. At this point it is possible to begin feeding the larvae with thawed frozen bloodworm (see the Feeding Page). These can replace partially, or fully, the small live foods you've been using up to this point. If you've been keeping up with the appetites of the larvae, you will probably be running low on live food any way. 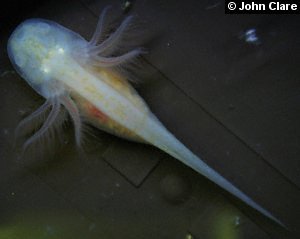
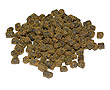
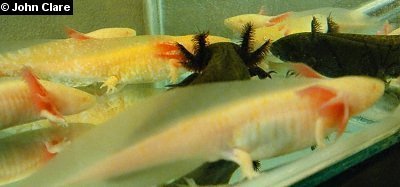
The photo on the left shows a 32 mm melanoid albino larva (D/D a/a m/m). At this stage its front legs are almost fully grown and hind leg buds are quite visible from the side (not visible in this photo though). Note the lack of iridophores (shiny pigment) in this larva, due to it being homozygous for the melanoid gene m. Xanthophores are almost absent in this larva, another effect of the melanoid gene. At 36 mm, the colour phenotype of each larva is generally very apparent - this means you can tell different colour types apart quite readily. The front legs are now fully grown and the hind legs are growing. At 40 mm (1.5 inches), the hind legs are about half grown. At this size, cannibalism can be a noticeable problem, so do try to keep the numbers in each tank at a low number (in the tank mentioned above, try to keep less than tens 40 mm larvae together). Feet and gills will still regrow rapidly on larvae at this size, however the older they get, the slower regeneration occurs. Another fact to be aware of is that wild type larvae tend to be more aggressive than non-wild types. Wild types will also show a tendency to attack non-wild types rather than other wild types. You can use biofoam filters to try to reduce the number of water changes. These aren't great filters for animals like axolotls, but for larvae they are quite safe (no risk of sucking up larvae). If you know what you're doing, you could use a canister/external filter on a large aquarium. You will need to make sure that the input is protected from sucking up larvae, and the output flow spread out so that it doesn't stress the larvae (excessive water flow is a common cause of stress in axolotls, leading to disease). Juveniles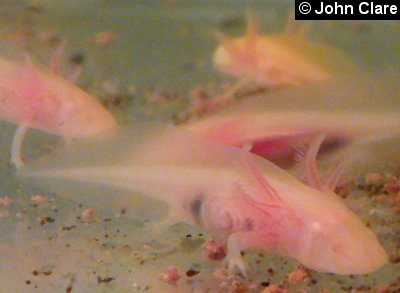 The larvae in the photo to the right are about 50 mm (2 inches) in length. The hind legs are not fully grown at this point but are quite visible. At this size they are more than capable of taking the 3 mm axolotl pellets. Once the hind legs are fully developed, the larvae are now miniature versions of the adults, so they should now be called juveniles, or sub-adults. Growth should be steady, and juveniles are quite capable of taking small pieces of earthworm (or whole earthworms that are small in size). If you find frozen bloodworm expensive and messy, it's worth knowing that at about 2.5-4 cm (1-1.5 inches) most laboratories begin feeding with axolotl pellets. Be sure to gradually changes foods though, rather than doing so abruptly: it may take a few days before the animals begin to take the "new" food. If you would like to know more about the stages of larval growth, look at the Biology Page. There is a nice diagram of the stages of axolotl growth, from egg to juvenile. The photo below shows 15 cm (6 inches) juveniles of various colours.
Unless cited in the Acknowledgements, all text and images are ©1998-2019 John P. Clare. All Rights Reserved. Bookmark Axolotl.org with:
What are these? | ||||||||||||||||||||


 reddit
 Facebook